
How to Publish a Book on Amazon: The Basics
So, when I was thinking about what to write for a blog post this month, I thought about several topics, but ultimately, I asked myself what I would want to know if I were publishing and looking for information. Though this isn’t the most exciting topic or the most interesting, when I was looking into publishing Legends of Avalon: Merlin, all I wanted was a single place to go for all the information I needed. Instead, I found lots of pieces of information from multiple sources, as if no one was willing to share the whole farm.
Here's the deal, if you’re self publishing or thinking of self publishing, then you and I are family. Because this is a scary thing, publishing on your own, and I don’t want to hoard information or ask for compensation for sharing it. I just want to make the waters a little less murky. So, this is what I’ve learned so far with publishing a book on Amazon. It’s not a complete encyclopedia, because I’m sure there are things I don’t know, but hopefully it answers the big boogie man question of where to start.
So, without further ado…
To publish a book on Amazon, you first need a KDP account—don’t worry, it’s super easy to set up. You’ll go to KDP and set up an account. It’s a super simple process and it will have you use your Amazon login, so don’t worry.

Once finished with that, you’ll have this page that opens up to what’s called your Bookshelf. This is where your books—both published and unpublished—will be shown to you. To create a new book, you will click on the ‘create’ button at the top right.

Now, you might think you need to wait to start this step until you have a finished manuscript or have edited one five times, but that’s NOT TRUE. You can set up your KDP and start a book on your Bookshelf as soon as you have an idea for a book. If you’ve never done KDP or published, I highly recommend taking the steps to set up an account and start setting up your first book on your Bookshelf. It’s both empowering and stress relieving to just start the process. So even if you only have two chapters written, I still say you should start setting up the book on here—you’ll at least feel like you’ve started accomplishing the publishing process, and there’s’ NO commitment to finish it if you end up choosing other avenues.
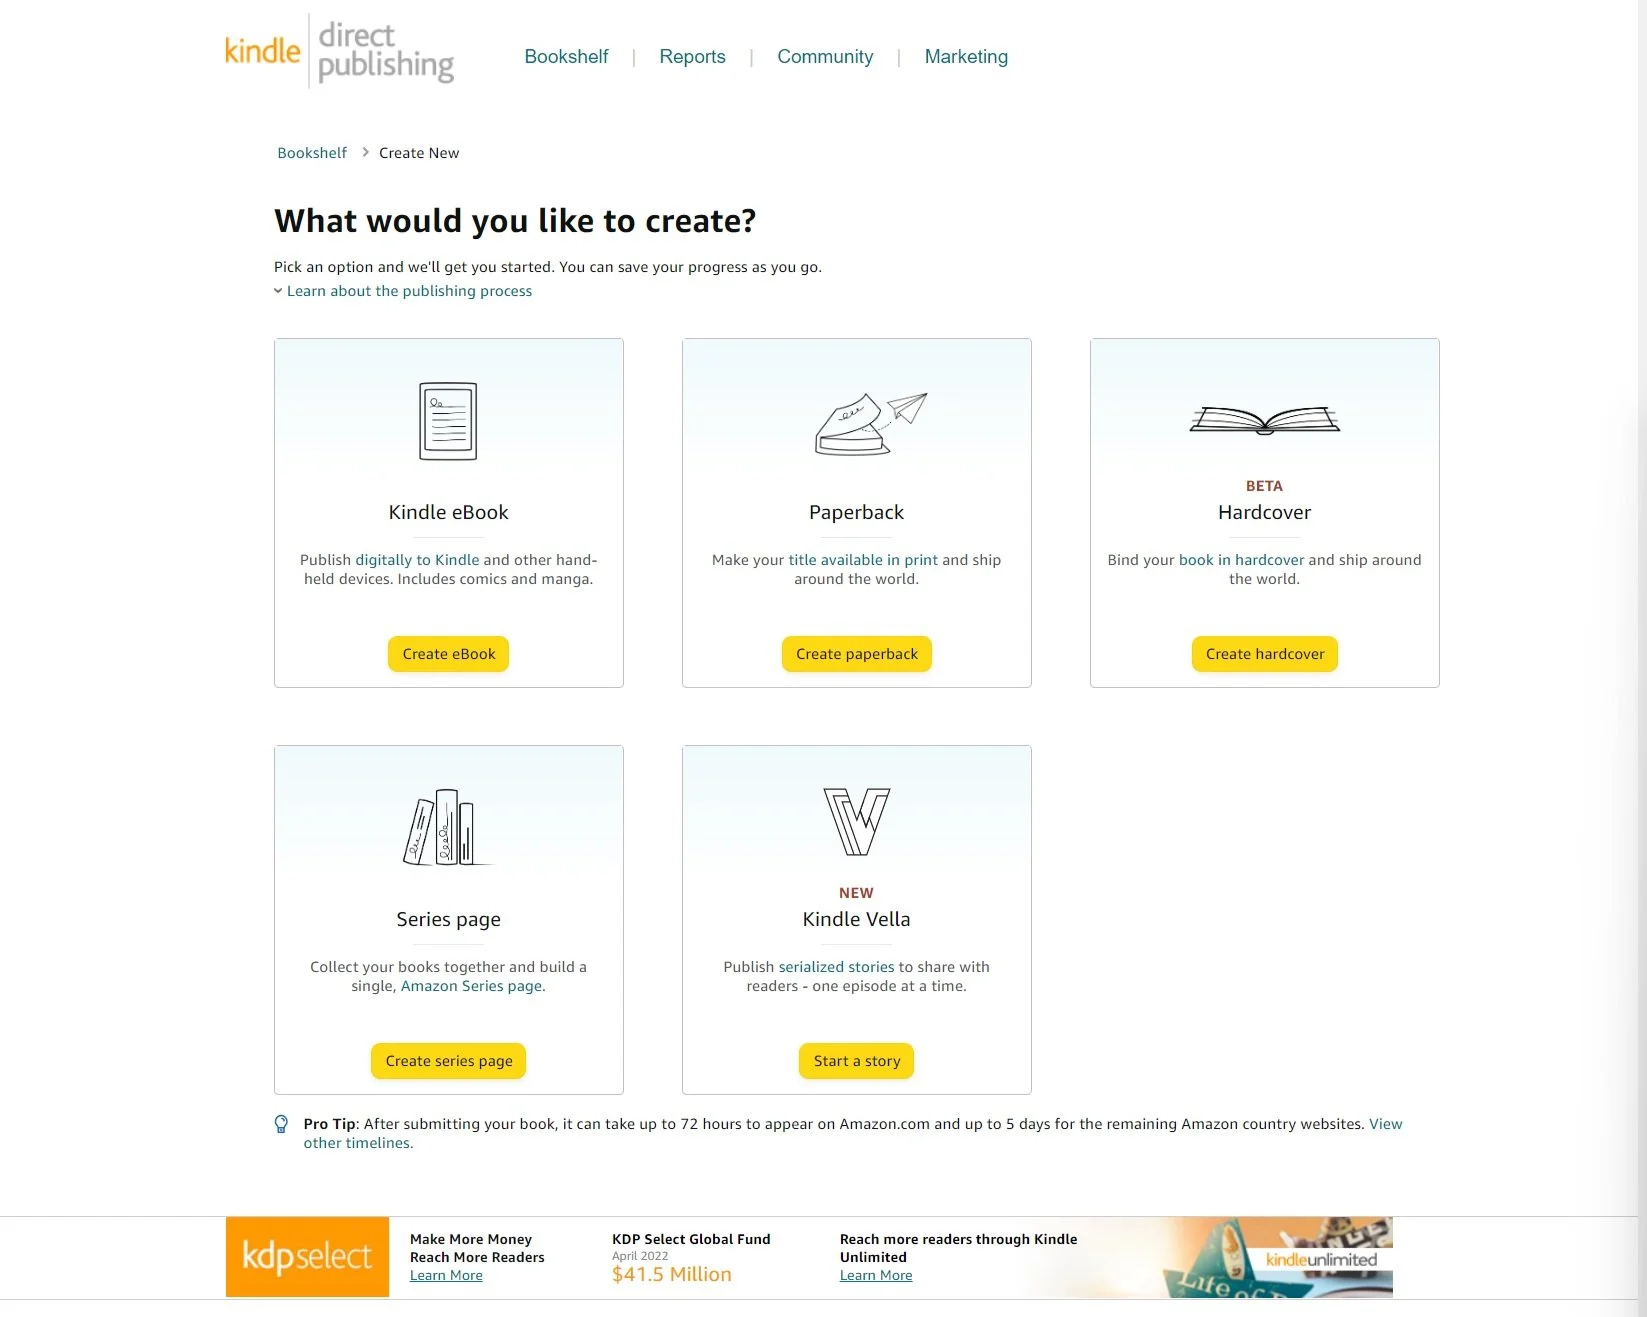
Next, you’ll come to this screen. Now, don’t freak out here. You don’t have to commit to just one book format. You just need to start with one. I’ll start with a paperback so you can see that process, but you can choose any of them, and you can add more formats to the same title later by just following the prompts under your book on the Bookshelf page once you’ve started the setup for at least one format. Ex: if you start the paperback set up and then save what you have done so far, it’ll show up on your Bookshelf. Next to it will be options to start creating other formats of that book. So don’t worry, you’ll get opportunities to do more.
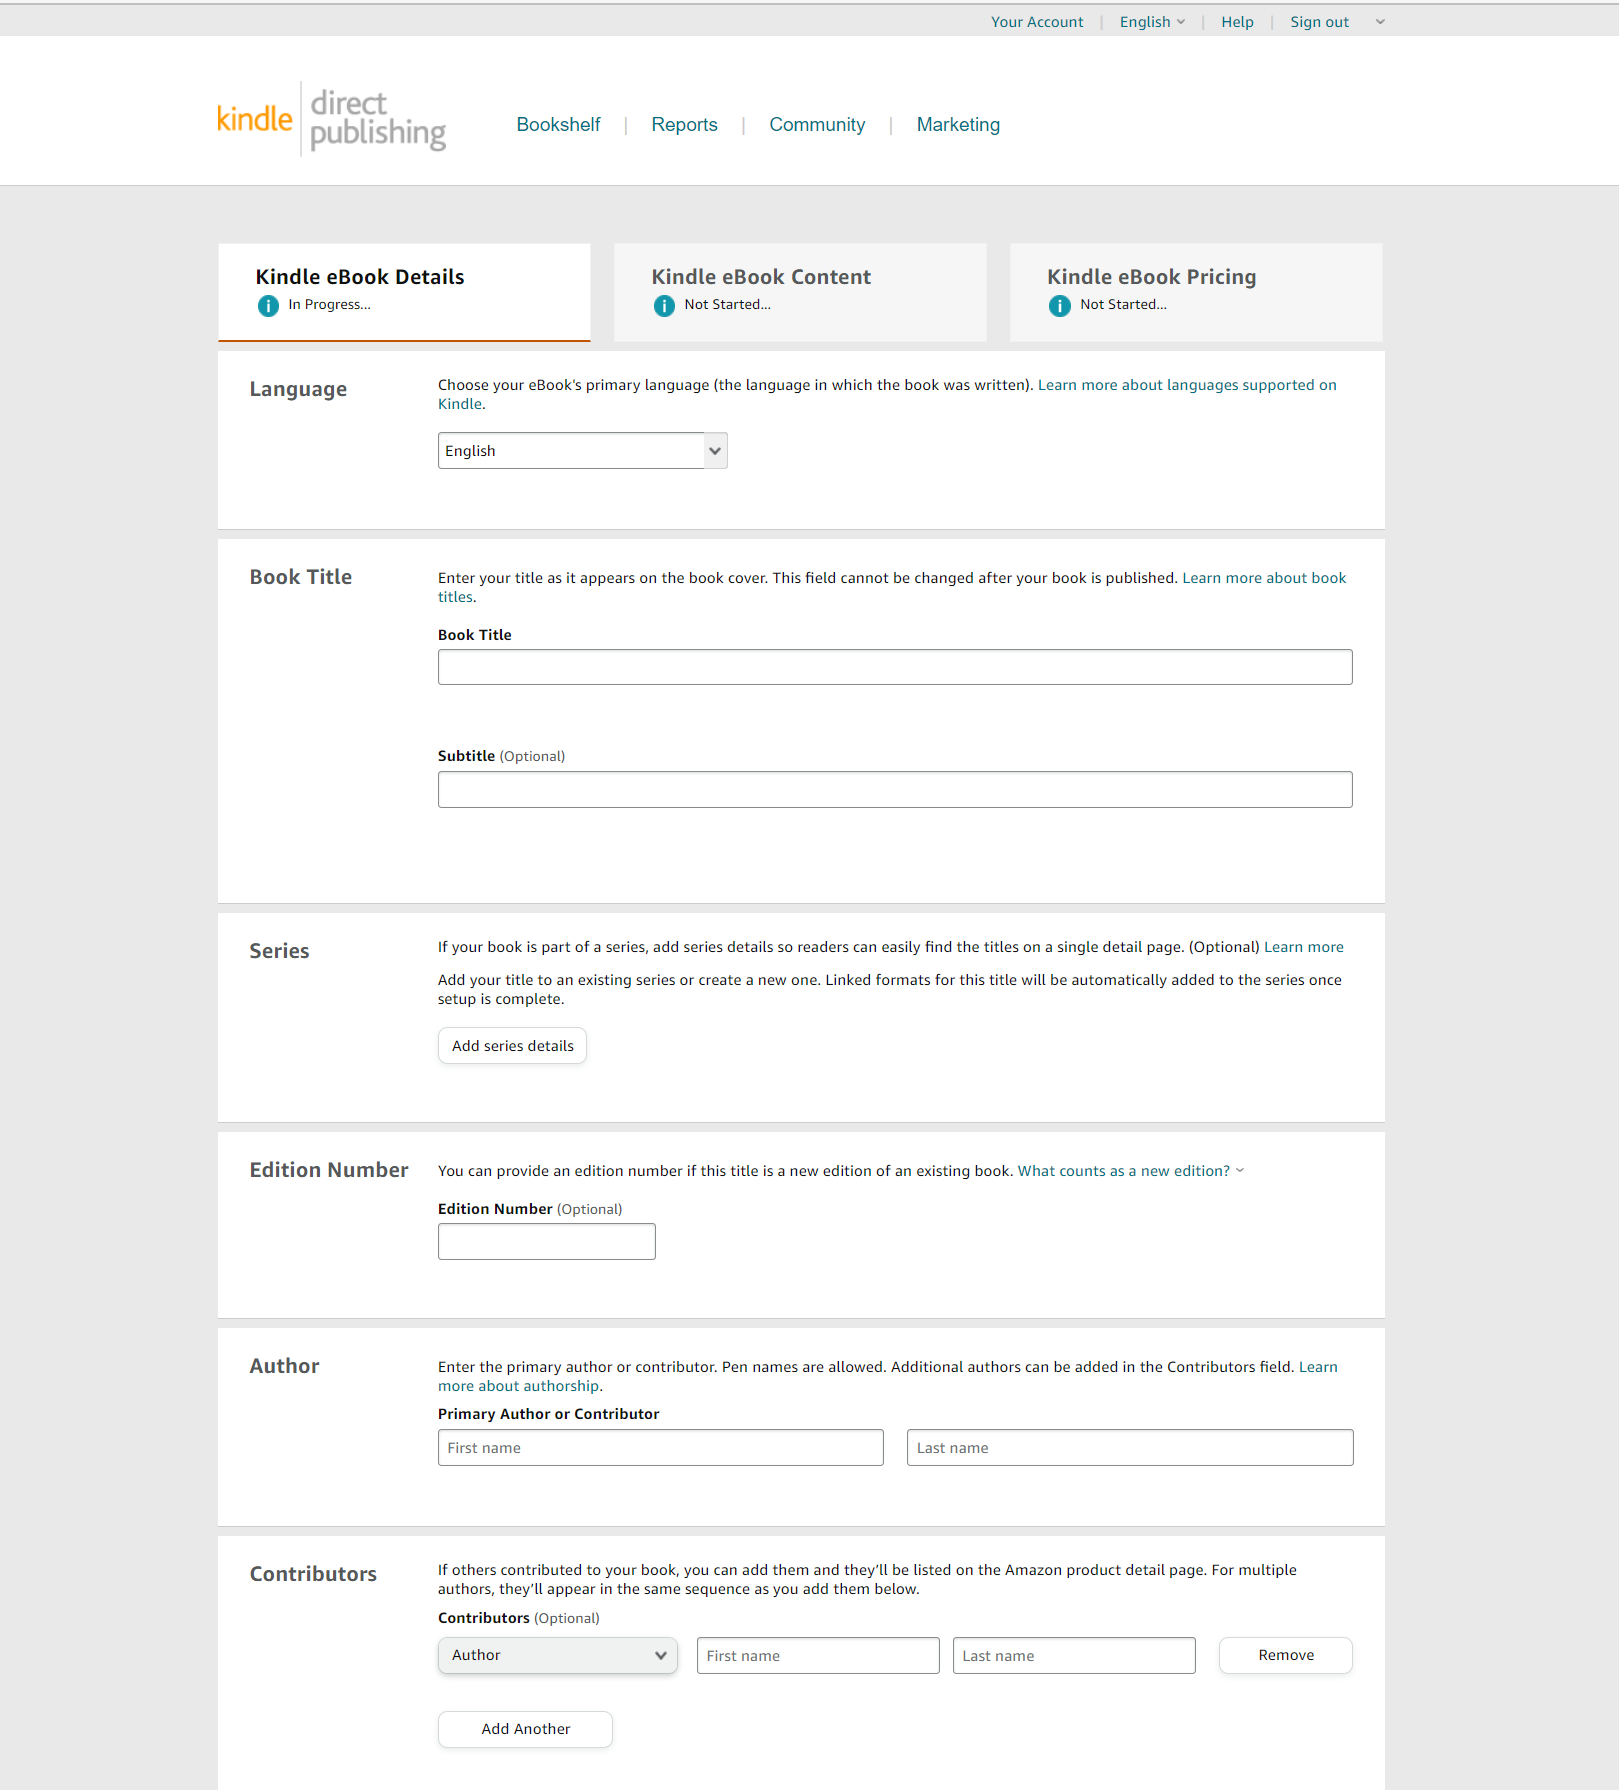
Here you’ll start filling in the information for your book. None of this is permanent until you actually publish, so don’t get too stressed about it. And even after the book is published, most things other than the title can be changed. I’ve personally changed my synopsis (after the book was published) twice. So don’t worry, this is all just a starting point.
You’ll fill in the different boxes, but none of them have to be perfect. Your title (until published) can be altered, so don’t worry if you don’t have it perfect yet. Just put something in here if you’re undecided on what you want it to be.
I skip the subtitle part because it’s unnecessary and I hate extra steps.
For the series section, if this is your first book and you plan on making it a series, you’ll add a new series. Amazon will walk you through the steps (which are all of two minutes long, so don’t worry), but if you’re unsure if you want it to be a series or not, guess what—you can add it later. If this book is part of an existing series (like mine) Amazon will prompt you to choose the correct series and it will link the title to that series.
The edition number is only if you’ve changed an existing book and are reprinting it as a new book, so don’t worry about that part.
The author is you or your pen name, which you can change.
The description is where your synopsis goes. Don’t freak out if you don’t have a synopsis yet—it can be one line for now if that’s all you have, because this section can literally always be changed (I would know, I’ve done it multiple times, post publication).
As long as the book your putting on here is something you wrote, then you’ll check the box that says you own the rights.
Next are your keywords. These are the words that Amazon will use to show your books to people shopping. There are lots of websites you can use to help you choose them, but it’s honestly a roll of the dice to choose ones that work well (these can be changed even after publication, so chill out). For me, I’ll just use the same words I used on the previous books in this series. I’m sure there are other people who know more about choosing keywords, but I based mine on tropes and categories my book fits into.

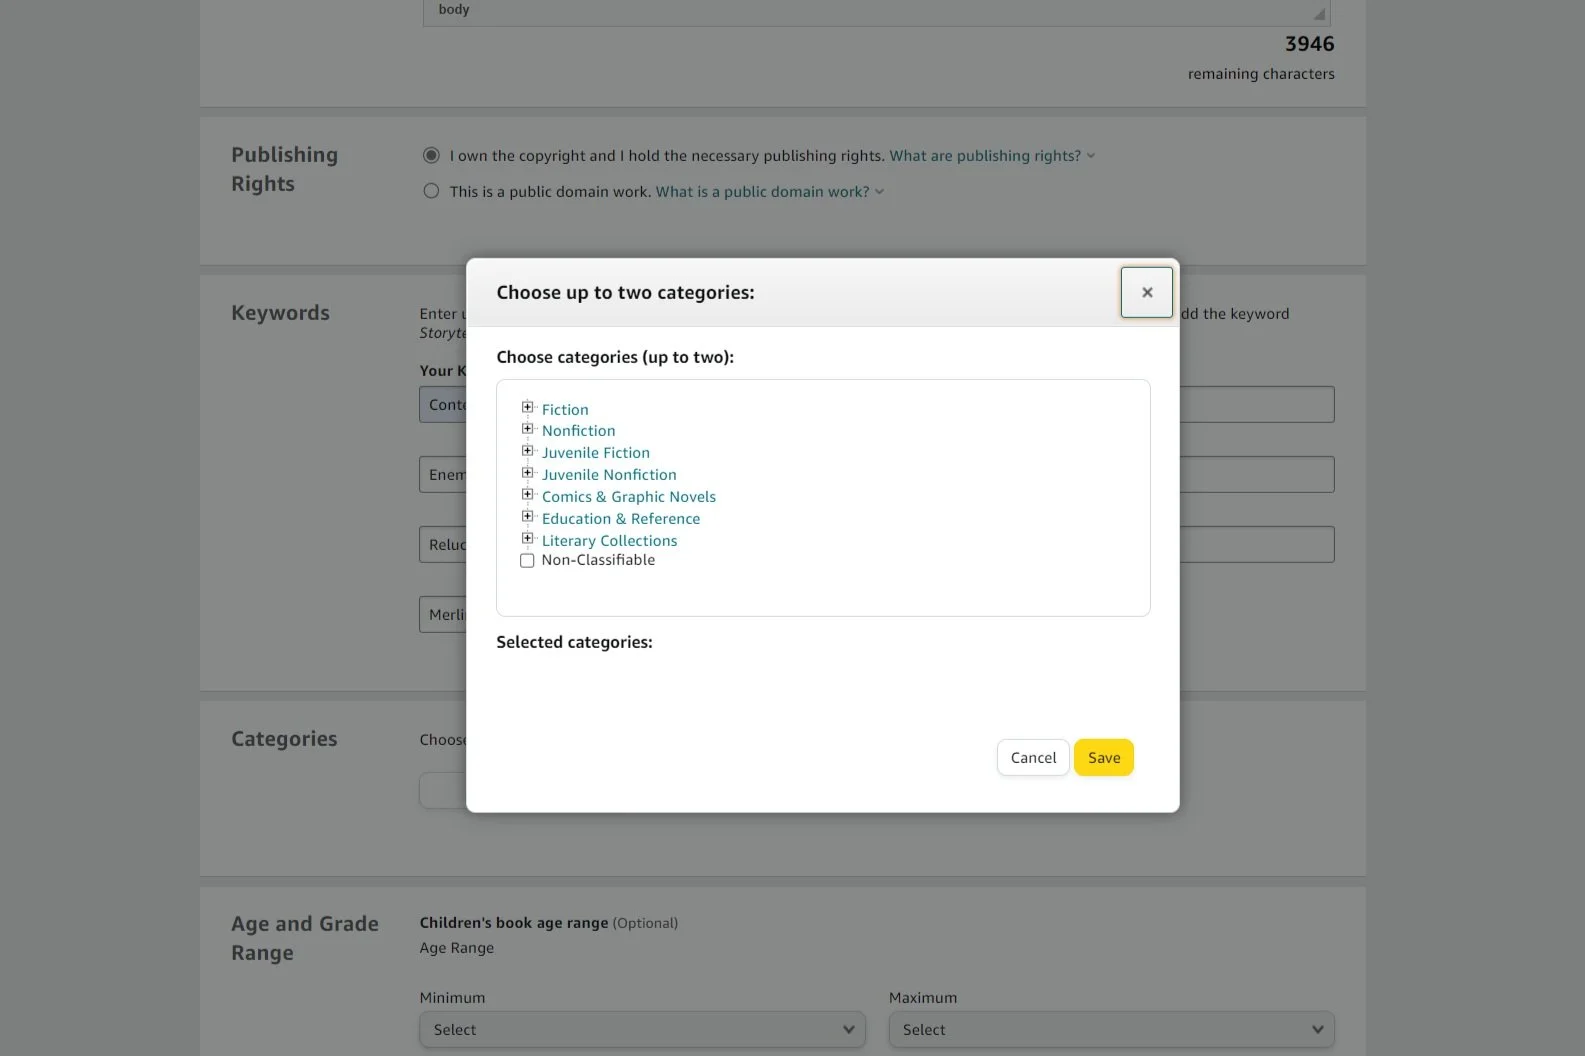
For categories, you’ll click on the box, which will open up like this. You get to choose two categories, and these are the sections that best describe your book. It will help Amazon get readers who enjoy content like yours to find your book. For my categories, I chose fantasy contemporary, and romance fantasy. (Again, these can be changed, so don’t feel pigeonholed).
On the next page, you have the option to use your own ISBN or use a free one from Amazon. If you’re just starting, I recommend a free one from Amazon, because ISBN’s are not cheap (and you pay separate for barcodes when you buy your own ISBN’s). If you want to buy your own ISBN’s, I use Bowker. You can change this later, though, so don’t freak out about buying an ISBN just yet. I personally use the free ISBN on my books and if I choose to print with another distributer, I’ll set up the book with them and use a purchased ISBN. (which I can talk more about in another post if wanted).
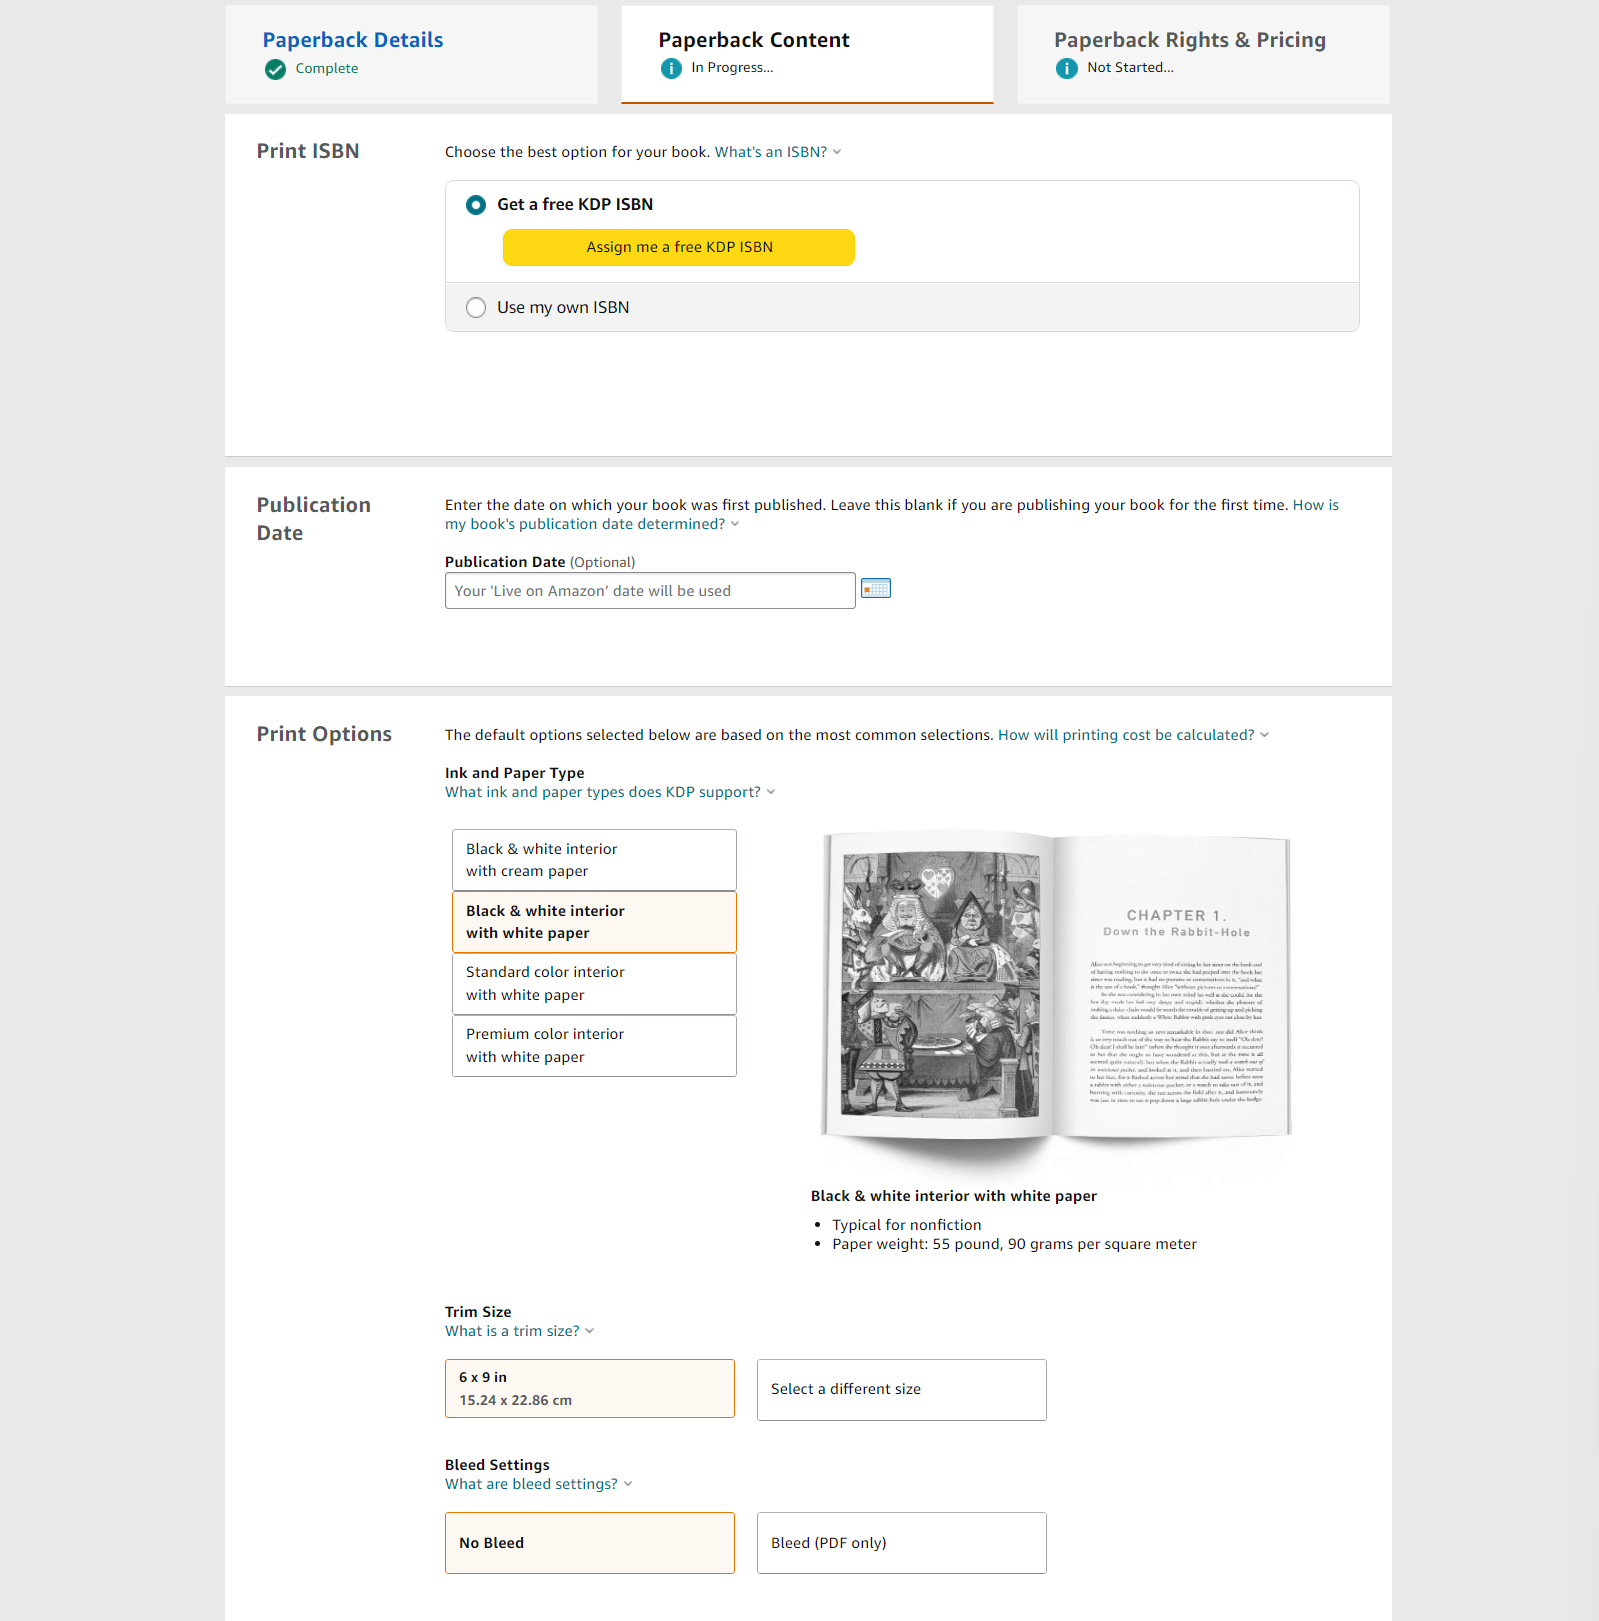
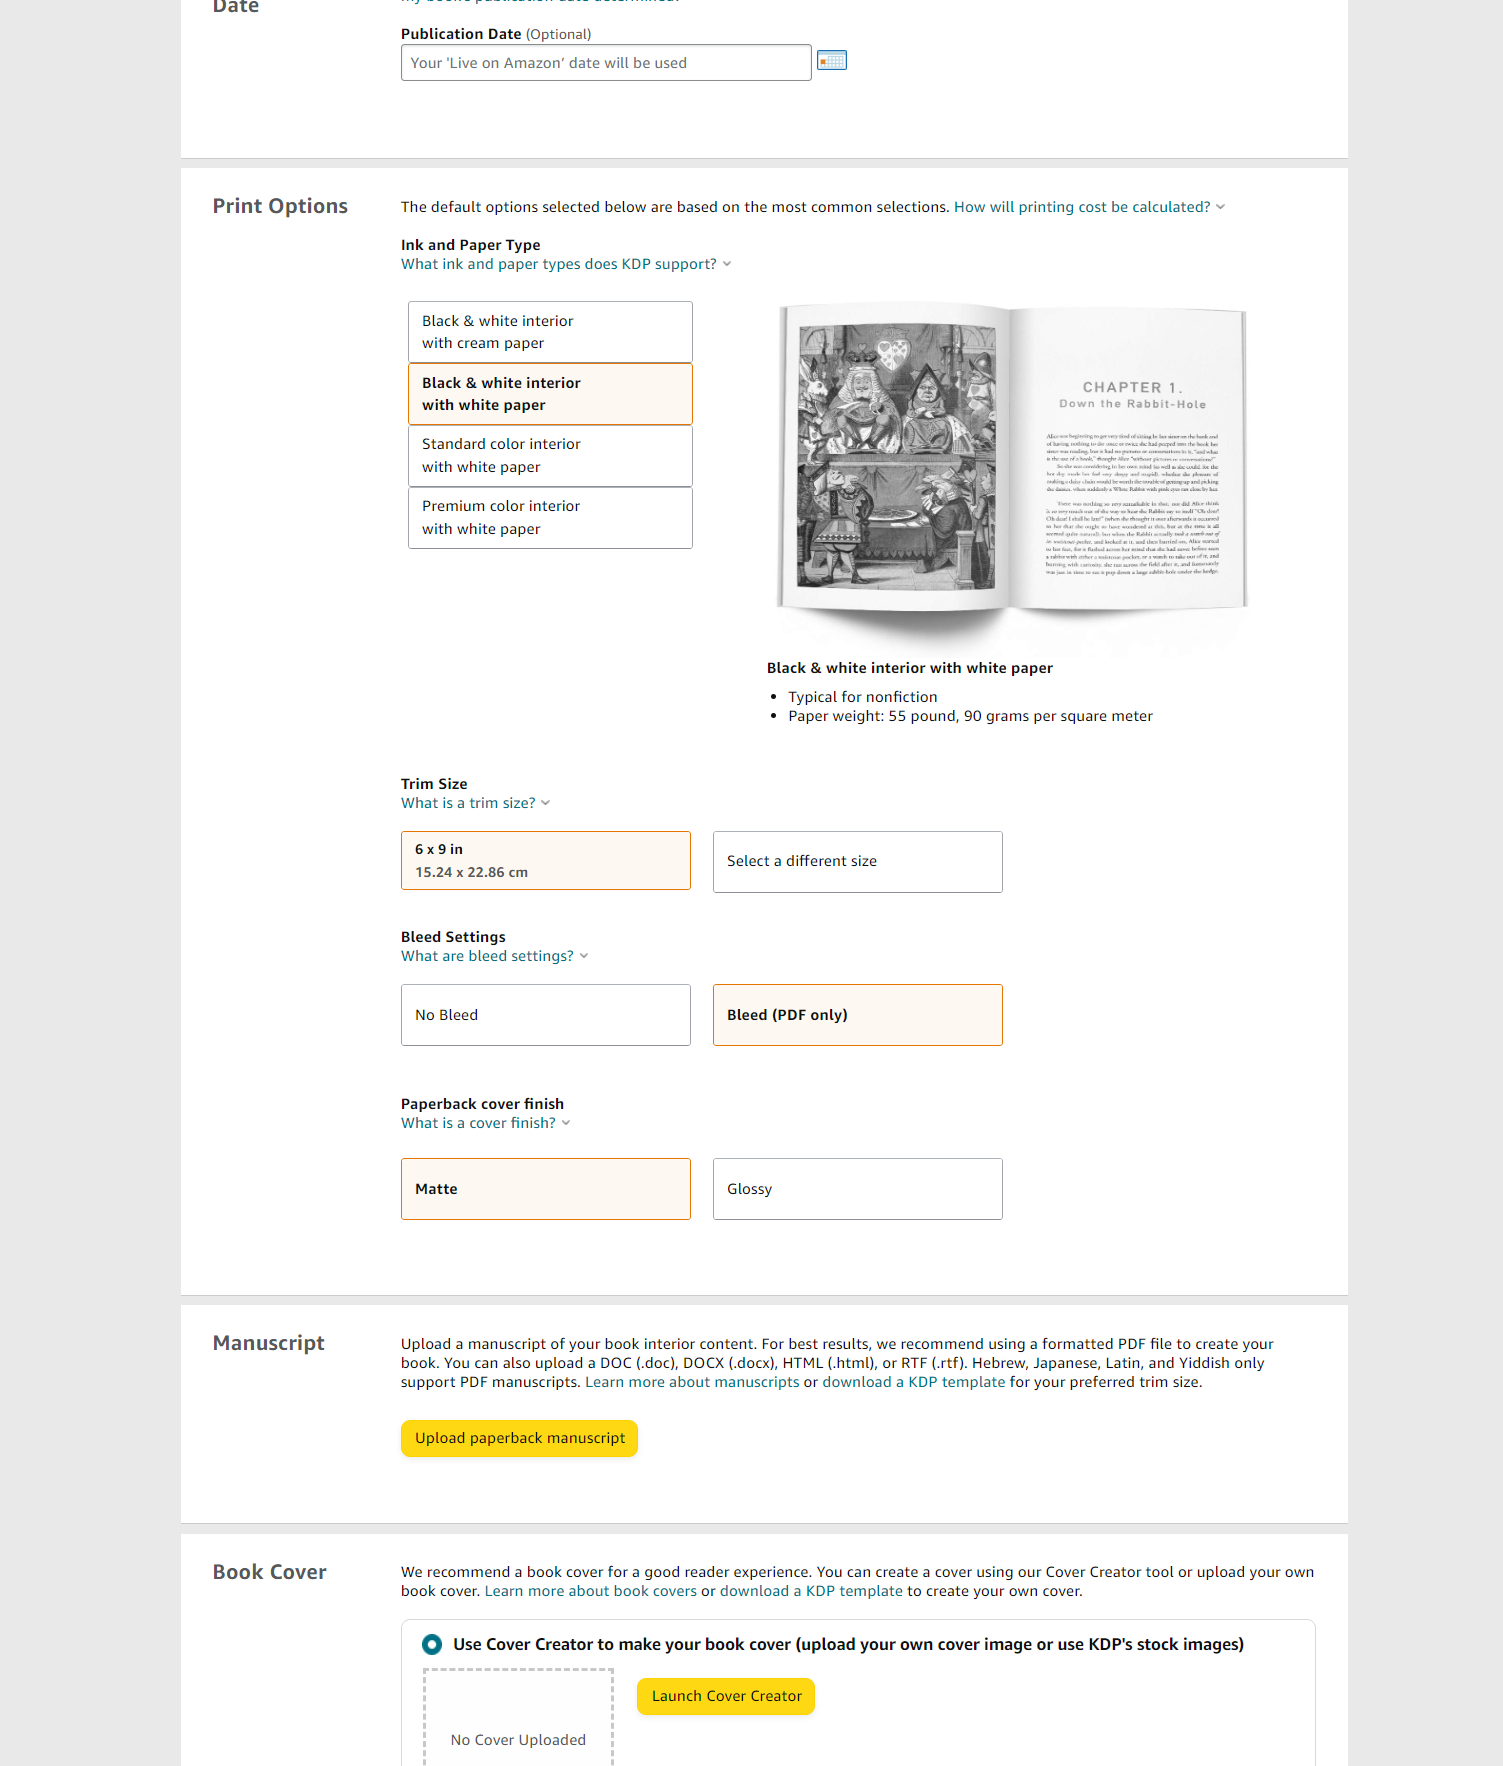
Next are your printing options. For this, I recommend checking books you own for what style you like best. This section can be changed though, so you can try a format and then change it later if you don’t like it. I always go with 6x9 because I think it’s the easiest to grip when reading, but choose whichever format suits you. I recommend considering how long your book is though, because it will be impacted by the size of the book.
Now, if you want images to go to the edge of the page (called full bleed) you’ll need to upload a PDF manuscript and choose ‘Bleed (PDF only)’. Formatting is an animal all its own, so if you’re unsure what you’re wanting, I’d just go with no bleed to start, and you can change it after you get a better idea of what you’re wanting.
As for the cover, it’s up to you whether you do glossy or matte. I prefer matte for this specific cover, but you can try one, order a proof and then switch to the glossy option later if you want.
Next, you’ll upload your actual manuscript. Now here’s the thing, you don’t ever have to publish the book with Amazon. You can simply upload all your info and then order a proof just to see what it looks like or send to publishers—whatever you want. So don’t feel glued into anything you choose on here. Because other than the title, you can change just about everything else even after you published.
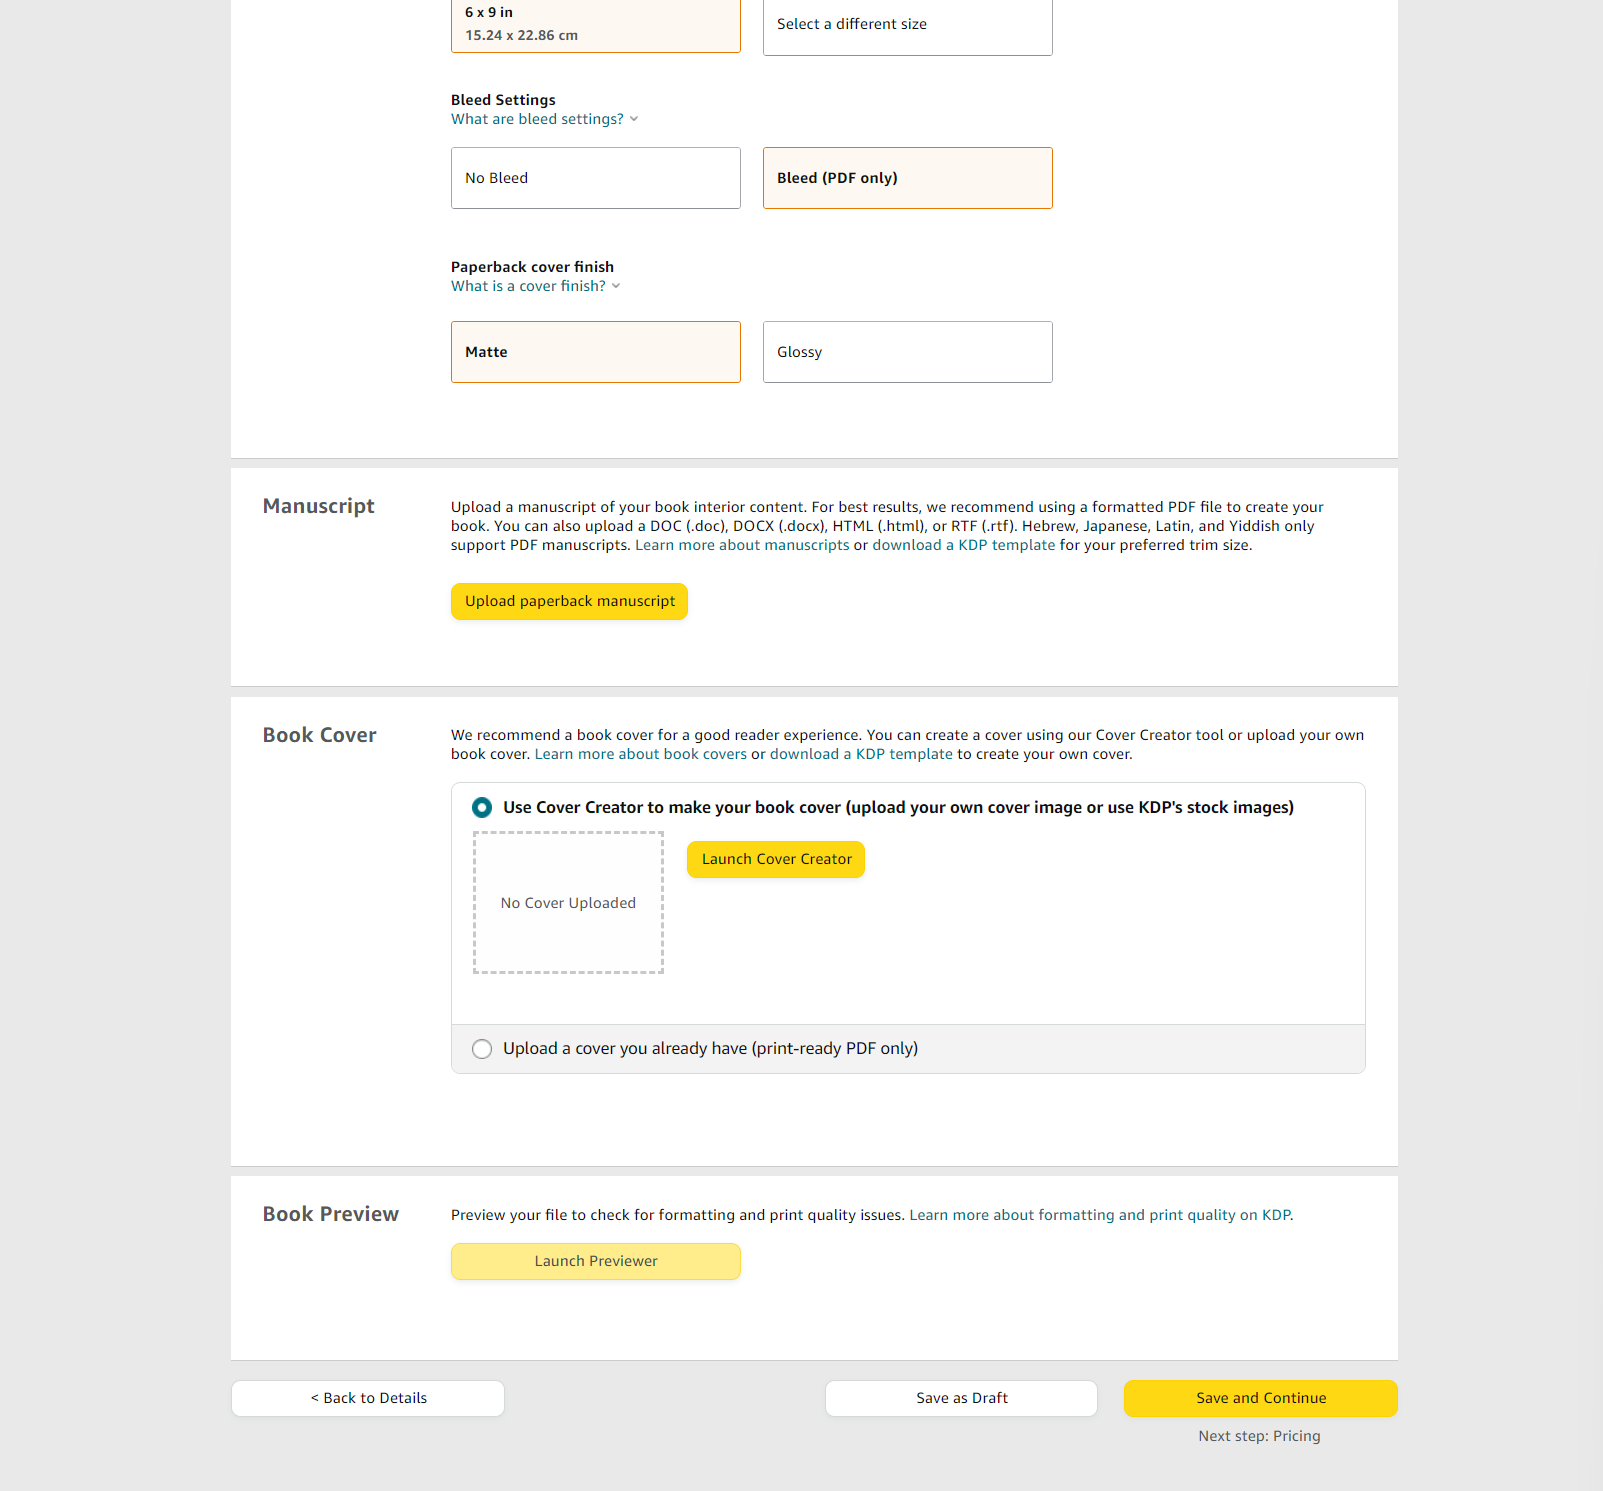
Once you’ve uploaded your manuscript, you have two cover options, either you can create your own using something like Canva (or Paint.NET if you’re old school like me) and upload a PDF version of that cover to Amazon, or you can use the cover creator shown on here as an option. If you choose to make your own cover, there is a cover calculator you can use that will give you a template for your cover.
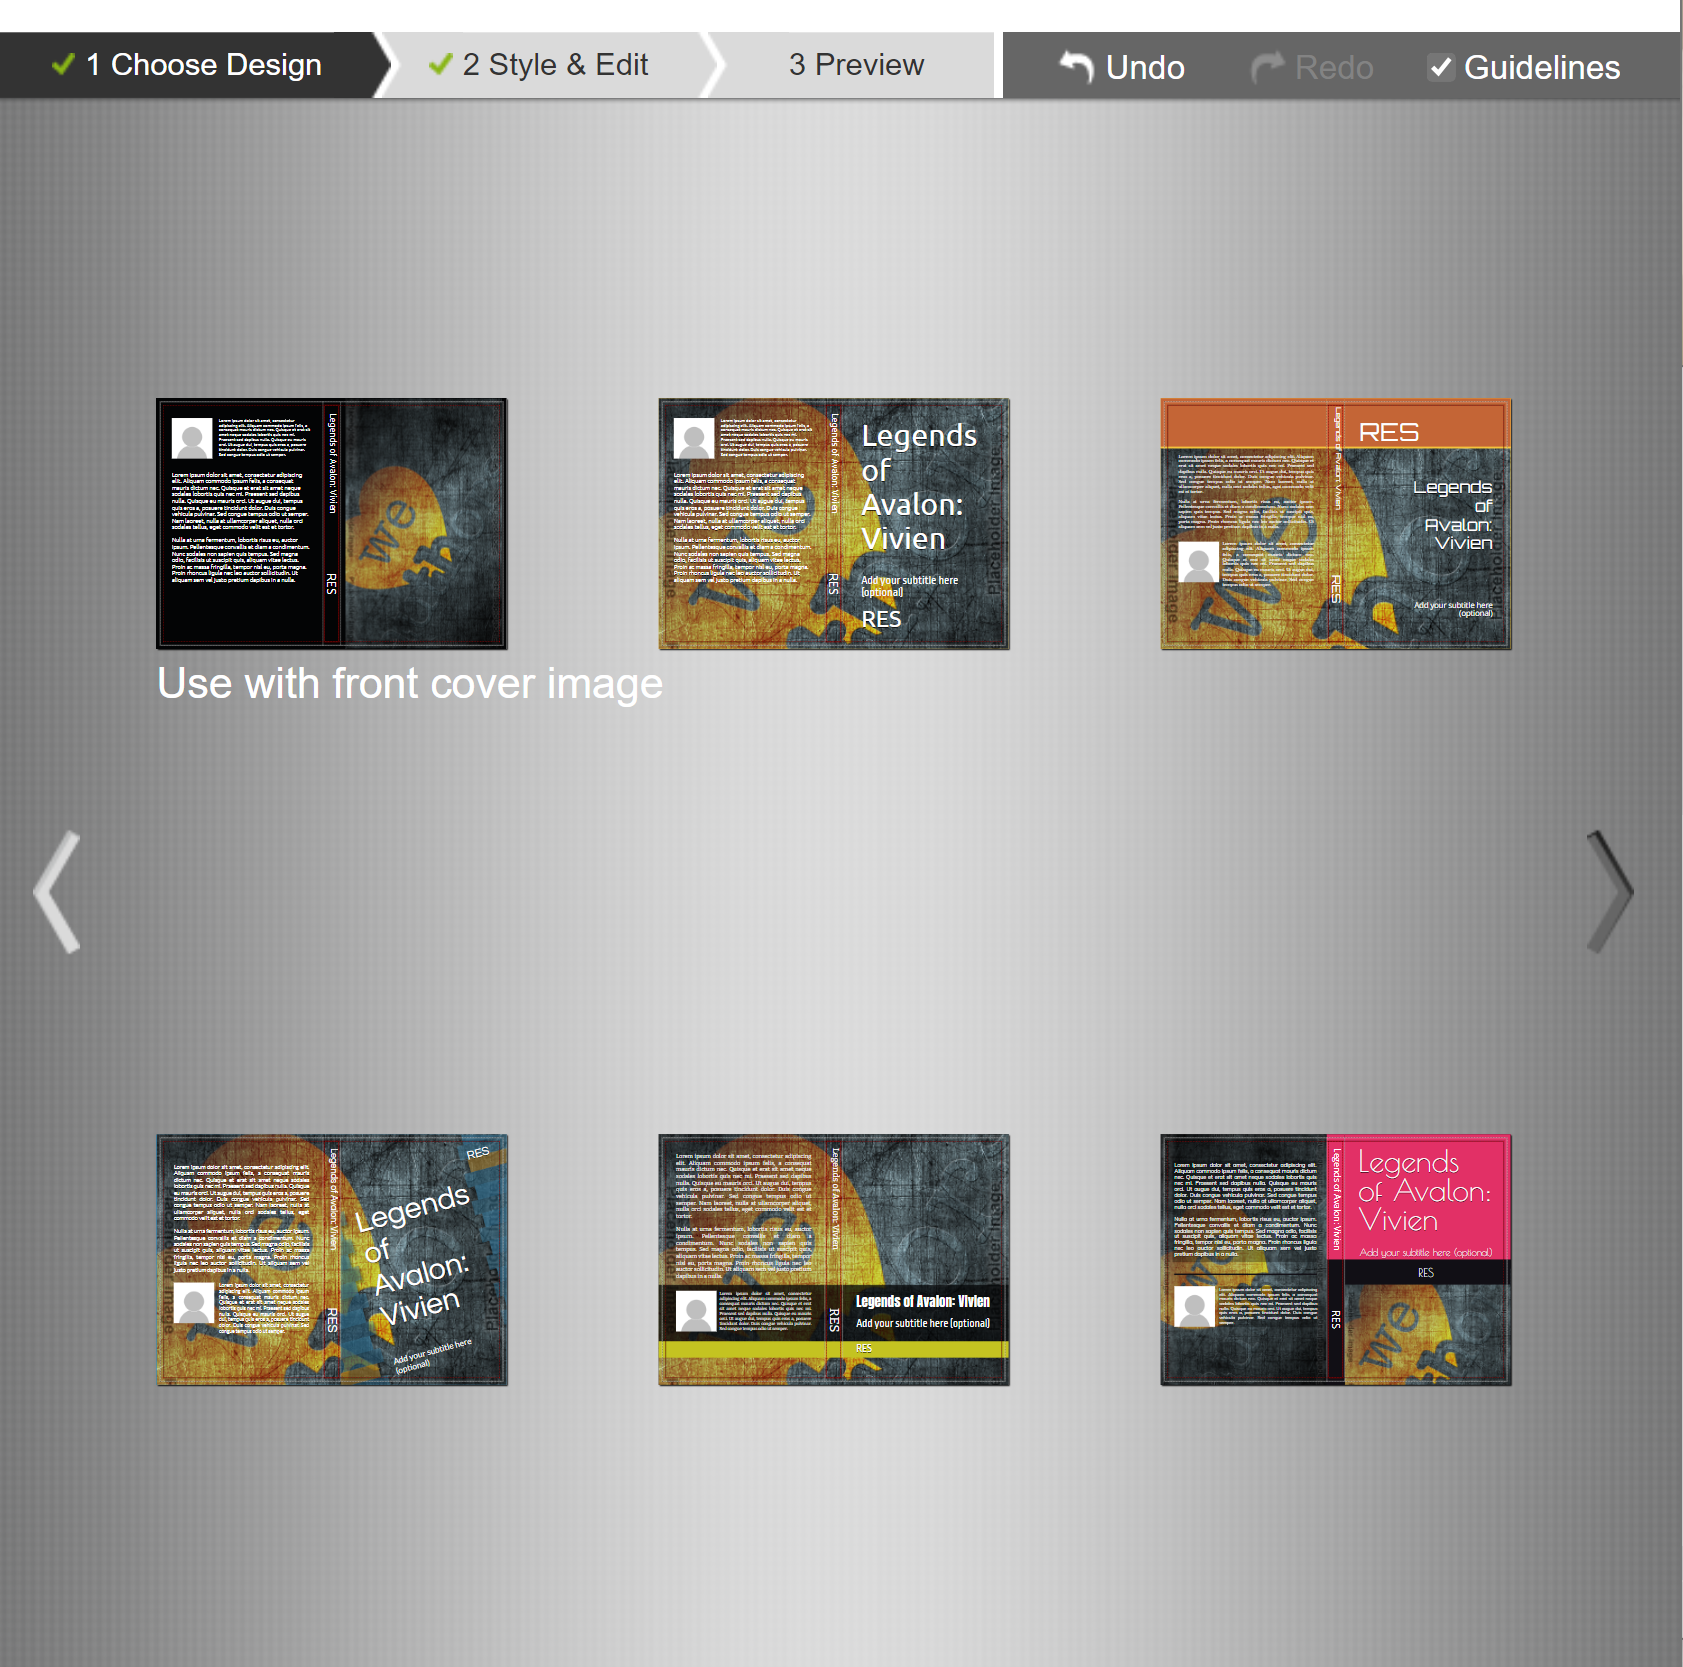
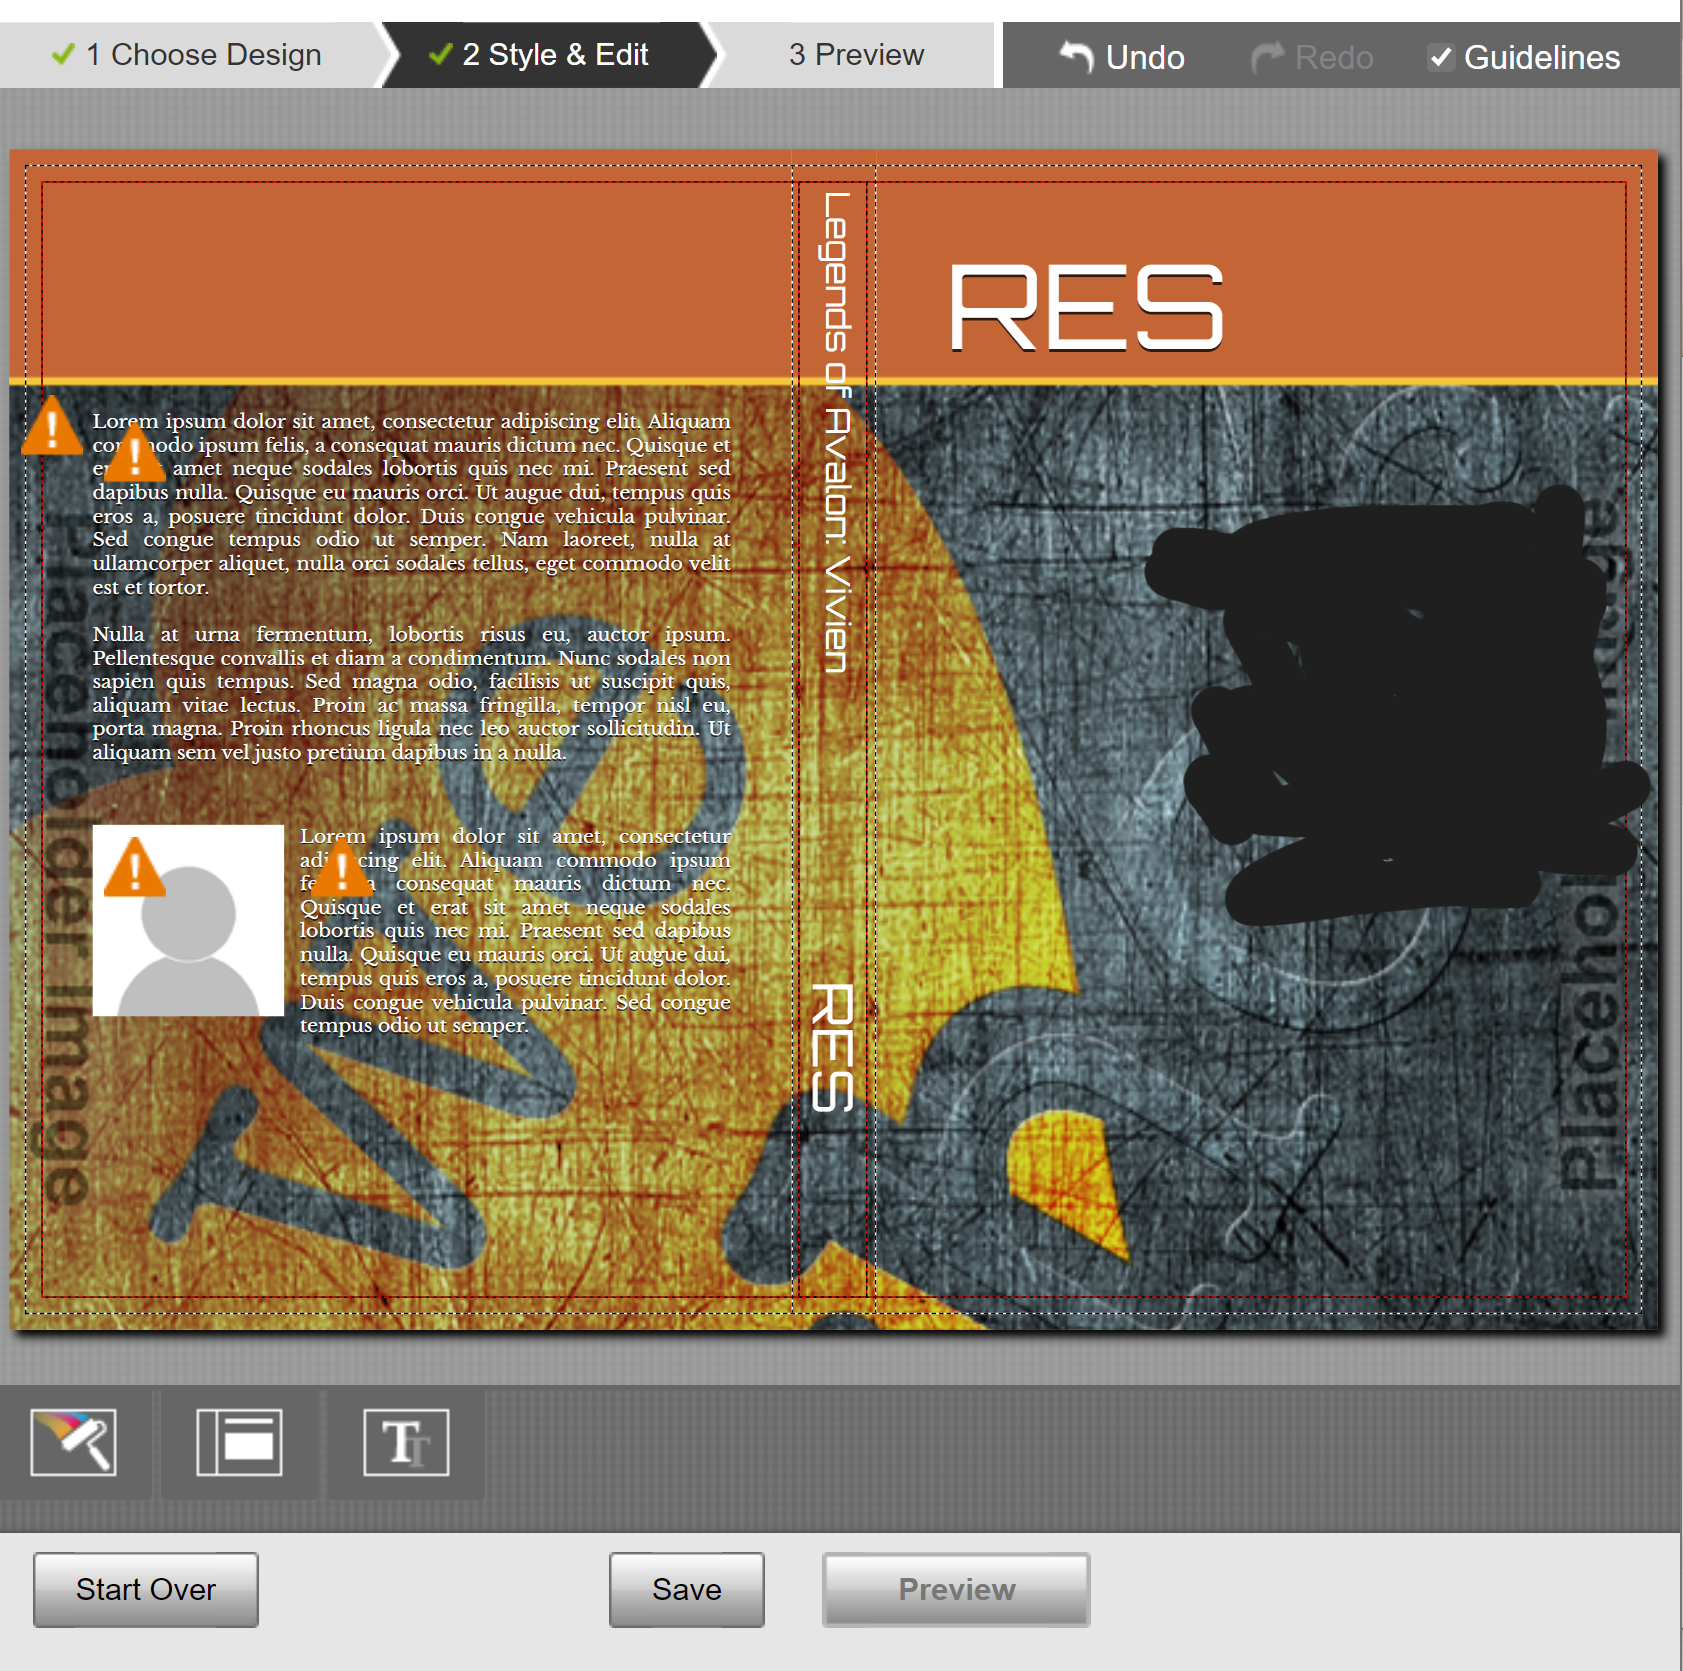
If you choose to go with the cover creator on the KDP site, it’ll look like this. It’s a somewhat limited tool, but great if you don’t want to make everything yourself or commission a cover. You get a host of layout options and you can upload your own images, but sometimes placing them perfectly can be a challenge. Personally, I prefer to upload my own custom cover via a PDF.
Once you’ve uploaded your manuscript and cover, you’ll click ‘launch previewer’ which is where Amazon will oh so kindly tell you all the things you did wrong. If the gutter or the outside margin are too small, or an image is too close to the edge on a non-full bleed manuscript, this is where it will notify you of those issues. The issues are listed on the left side of the page, along with the corresponding page numbers where that issue is present. It can take a while, but eventually you’ll get done with this part.
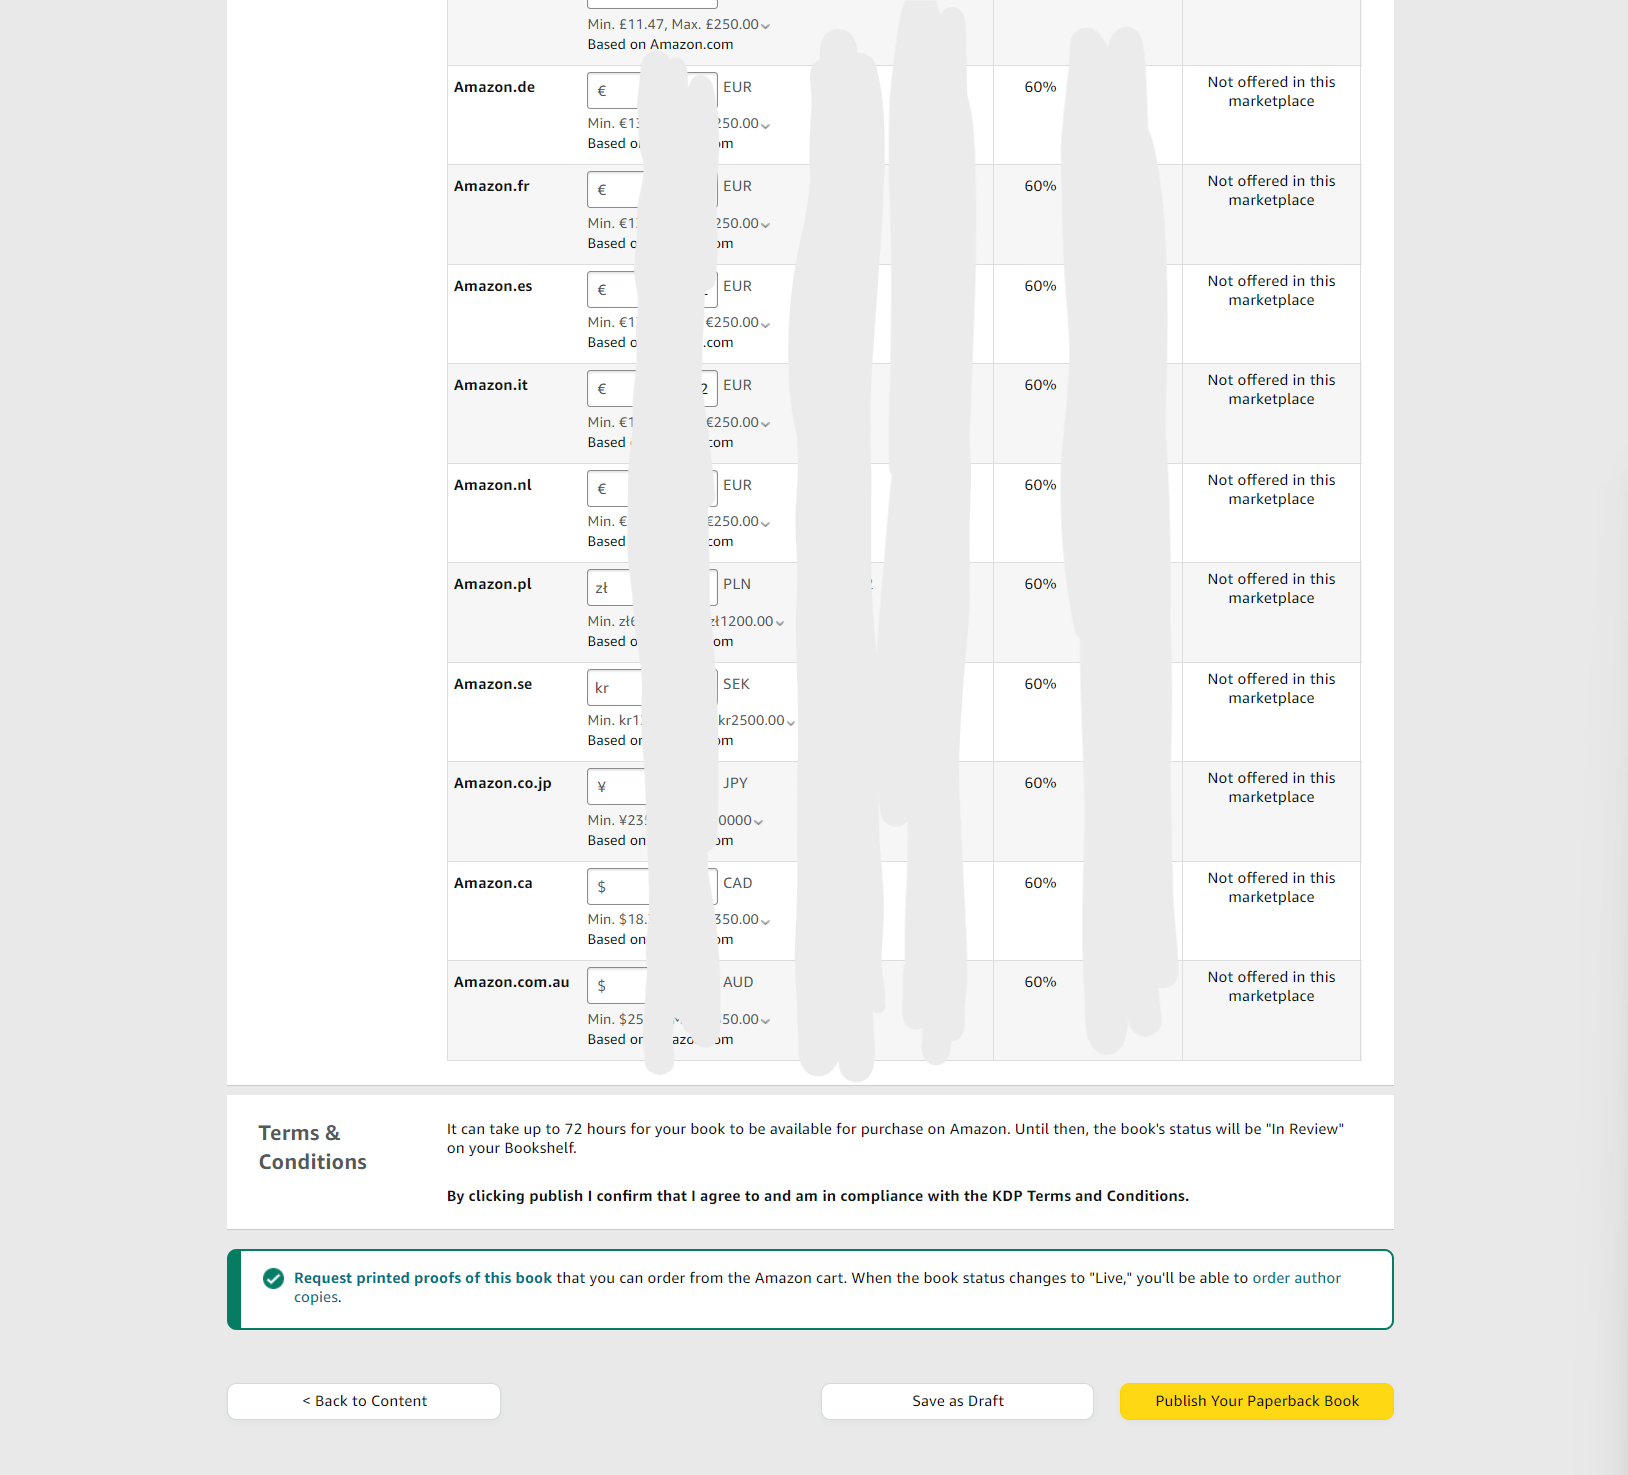
For the next page, you’ll be choosing pricing (once again, it’s not permanent. You can change it even after publishing). Pricing will be a completely personal choice for you.
After you choose your marketplace (Amazon.com for US), you’ll be asked to choose prices.
This is why you need to have your manuscript uploaded, so Amazon knows how much it’ll cost for them to print (plus how much they’ll charge you to sell it for you), and how much you’ll make in royalties depending on the price you choose. You can test out prices, and see what your potential royalties will be, and it can always be altered. The page shows you the royalties for each country, but you get the choice overall for %60 or %40 royalties. The %40 option is for distributing widely to other retailers and requires Amazon to assess if you’re eligible, so you’ll probably want to do %60 (which is what I do).

Once you’ve gone this far, you can do a few things. You can save as draft, which saves all your changes to your bookshelf where all your books (published and unpublished) are catalogued for you, you can publish your paperback if you’re ready, and it will be available to shoppers as soon as Amazon approves it, or you can request printed proofs.
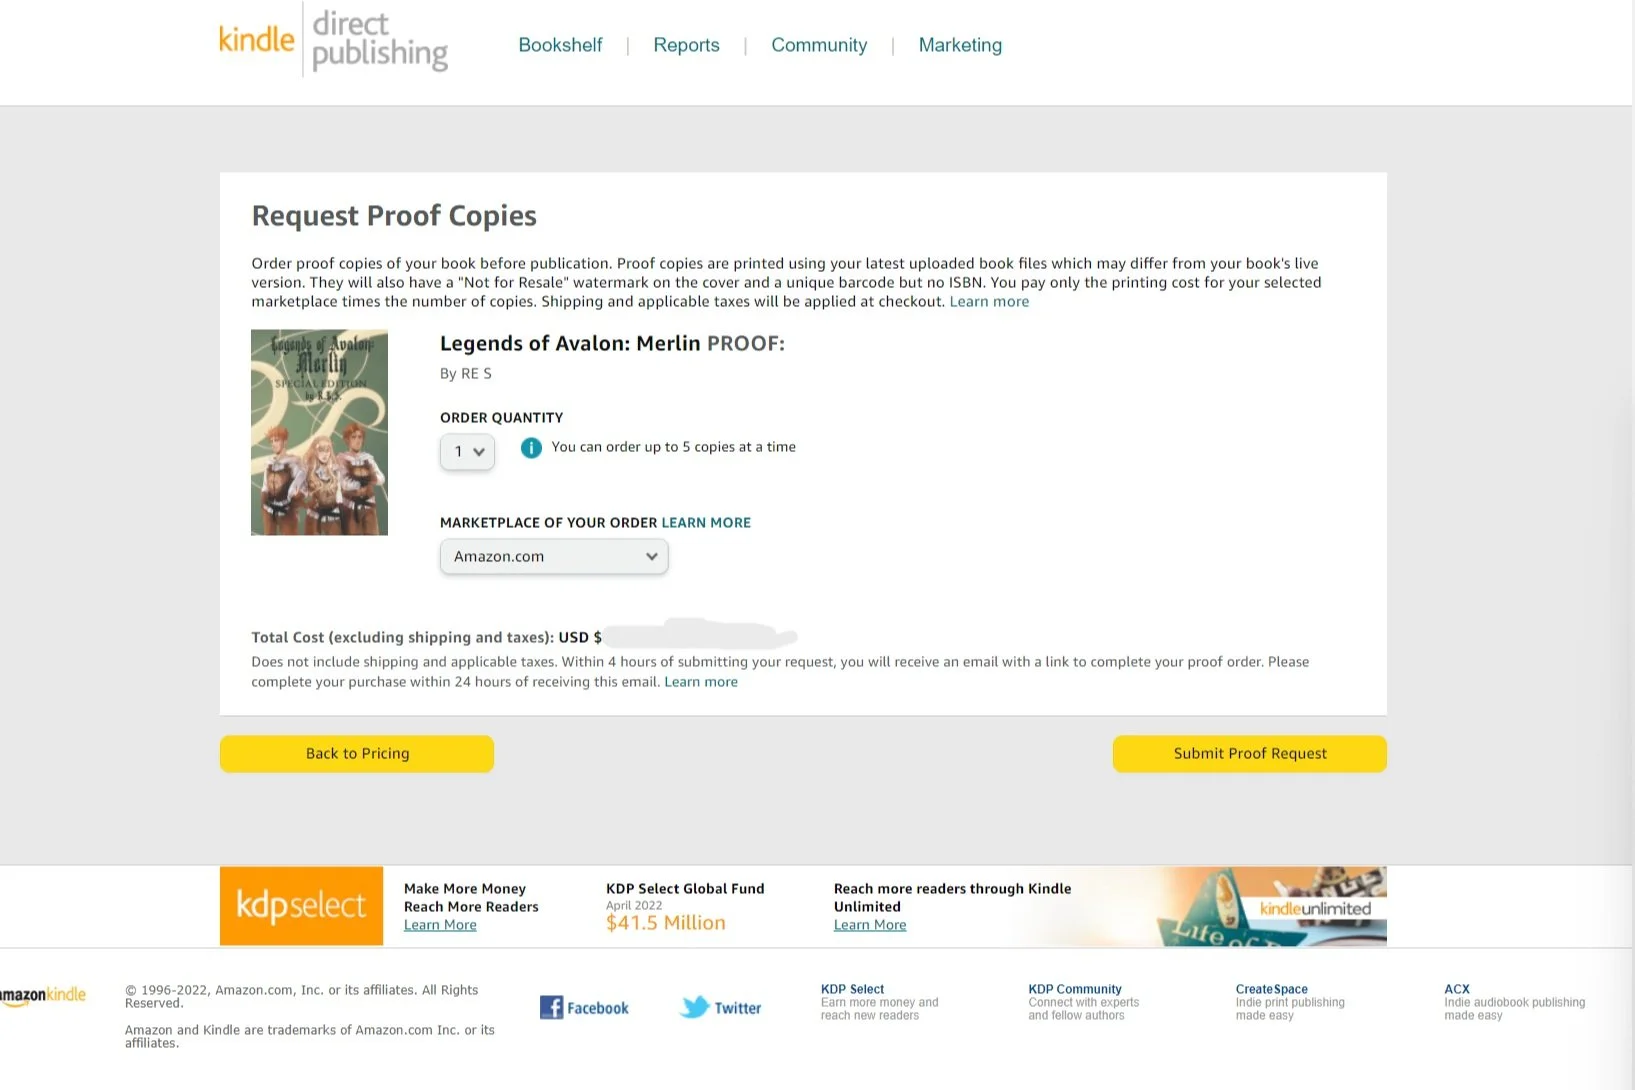
If you want to request a proof, you’ll click on the link and, after saving your progress when prompted, you’ll go here. On this page, you can decide how many proof copies you want to order—you can order no more than 5 at a time—and Amazon will tell you how much each proof will cost you. Then you can submit your proof request.
Amazon will send you an email after a couple hours and tell you your proof request has been approved. Your proof copie(s) will show up in your Amazon shopping cart and you can order them just like any other product.
Now, the process for eBook is exactly the same, with two additional steps at the end of the first setup page:
If your book has content that isn’t appropriate for a certain age range, you’ll mark it by giving a minimum and maximum age. I recommend either doing this, or giving a disclaimer at the bottom of your synopsis that states what may be triggering or inappropriate for certain readers. Since I put a disclaimer in my synopsis, I don’t use an age range.
At the bottom of the page is where you can choose whether or not you’d like to set up preorders. Unless you want to publish your book today, I recommend doing pre-orders. It will require nothing of you other than to select a publication date, but will allow your book to be pre-ordered by shoppers. (You can still change details or release dates up until about 13 days before the release of the eBook, so you’re not stuck with the date you choose now).
The rest of the process is very similar, except that you do not choose a print size or order a proof copy. However, for both physical books and eBooks, you can change the content or descriptions up until publication, and you can even change it after publication. Though changing the content of the book after publication is tricky, because Amazon will claim that they need to sell all previously printed copies before selling updated ones, so be warned.
And that should cover it. I personally don’t print my hardbacks through Amazon—instead I print hardbacks with IngramSpark and have them distributed to Amazon—but I assume the process is much the same. This is not every trick or tip ever conceived regarding publishing through Amazon, I’m sure, but it’s what I’ve learned so far.
Hopefully this answered some questions for people or made you feel just a little bit more confident about self publishing, and I really do recommend setting up your KDP account and setting up your first book on your Bookshelf, just so you can get the feel for the site. You don’t have to publish anything or commit to anything, and it can all be deleted if you so choose. So I say kill at least one of the self publishing boogie men and familiarize yourself with the site. It’s not as scary as it seems—I promise.
If you have other topics you’d like me to post about or further questions about this one, please comment them! The whole point of this is to be helpful, so let me know if you having an idea I can help with!
I’m praying for you all as I type this line, and I hope all you people considering self publishing or already doing it, get the confidence you need and are affirmed in knowing that you can do this! It seems scary—and it is—but it’s also hugely rewarding and I have the utmost confidence that